Setting Up Fundraiser Participants in Simple Raise
Table of Contents
Choose the Method for Entering Participants
- Self-Registration
- Select Existing Participants
- Manually enter participant information into Simple Raise
- Import participant information using a file
- Sync participant information into Simple Raise from CutTime
Final Step: Sending Out The Invites
Managing Your Fundraiser Participants
- Editing a Participant's Details
- Sharing Options
- Action Options
- Goal Tracking
A Note About Participant Groups
What is a Participant?
Fundraiser Participants are the individuals from your program’s organization that solicit contributions from donors. Good news, you can invite as many participants as you like for each of your fundraiser campaigns!
After logging into Simple Raise, go to the Campaigns page and select the specific fundraising campaign to which you wish to add participants to.

PLEASE NOTE!: For Calendar Fundraisers, Participants must be added to the campaign in order for the calendar fundraiser link to work for Supporters. Each Participant will have their own Calendar Fundraiser link.
Next, click on the Participants tab to be taken to the Participants list for this Campaign. Select the "Add Participants" button.

Choose the Method for Entering Participants
You will now choose the method by which you wish to enter participant information into the fundraiser:
- Self-Registration (ONLY available for accounts that have not connected to a CutTime account)
- Select Existing Participants
- Manually enter participant information into Simple Raise
- Import participant information using a file
- Sync participant information into Simple Raise from CutTime
Self-Registration
If you would prefer to allow your participants to self-register, rather than import them or invite them through phone/email, you can use the Self-Registration feature on your campaigns.
NOTE: If your Simple Raise account is connected to a CutTime account, Self-Registration for Participants IS NOT AVAILABLE.
1) Go to the Campaigns page and select the Campaign that you would like to invite your Participants to self-register for.
2) On the Campaign Dashboard Page you will see a Self-Registration Box in gray.

3) Copy the link and share it with your members, or download the QR code so that your members can scan to register for this campaign.
-
Participant Signup Experience
Once a member has received either the self-registration link, or scanned the QR code to signup, they will see a signup page where they can begin entering their information.
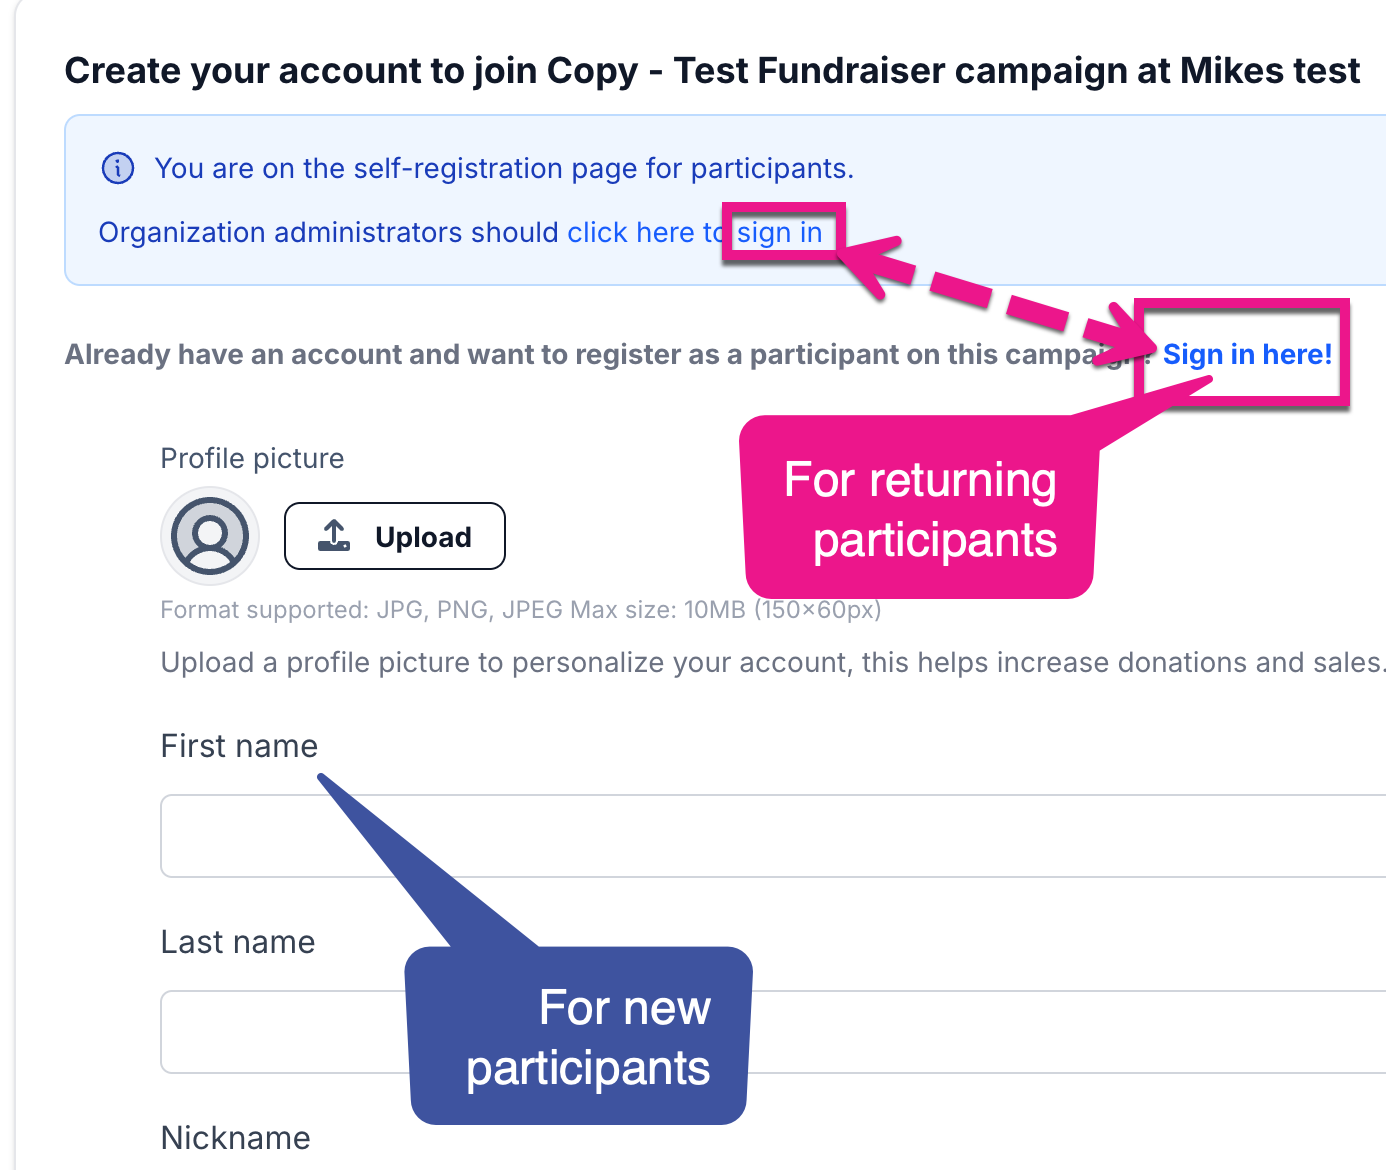
a. If the participant already has an account in Simple Raise for this program/organization, they can click the "Sign In" option.
b. If the participant is brand new, they can fill out the form and add their Name, Nickname, Email Address, Phone Number, and a Password before clicking the "Sign Up" button to finalize their signup.

NOTE: Participants will then need to verify their account. This will either be sent to their email or phone and will look something like this;

Once they fill out the form and create a password for themselves, they will be logged into Simple Raise where they will see a banner prompting them to "Resend verification link".
They can ignore this if they go to their text/emails and immediately verify their profile.

But if the participant waited to verify their signup and the verification code expired, they can use this banner to request a new verification link be sent.
Manually Adding Participants

Select Existing Participants
If you have added Participants to another campaign before, they will already be in your SimpleRaise account. On the Existing Participants section you can type a specific name under "Select Individual Participants", or use the Group or Existing Campaigns option to choose from. You can also select the "Add All Participants" option to add all participants from across your account.

Manually Inviting Participants To A Fundraiser (Adding By Email/Phone)
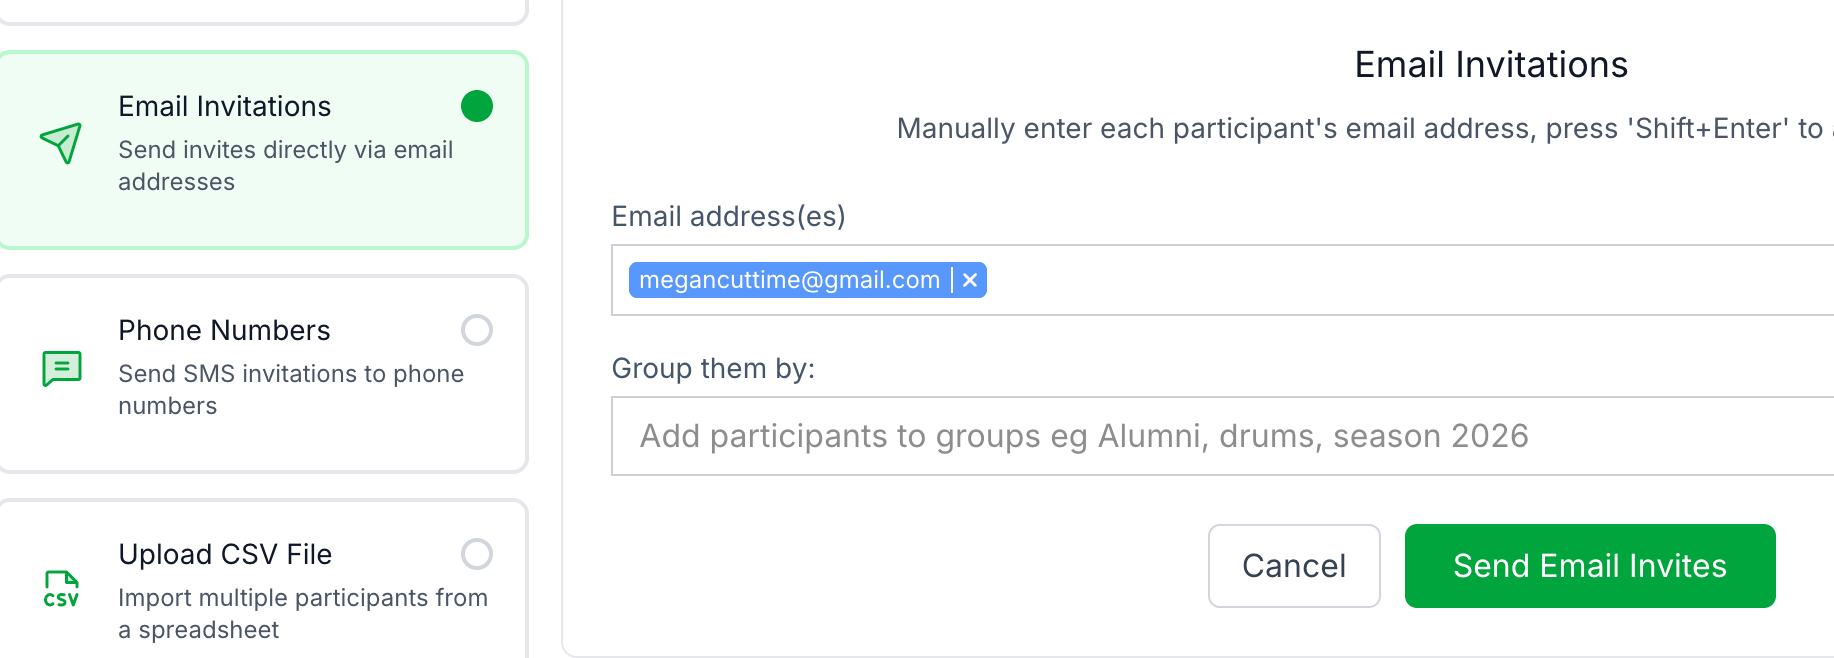
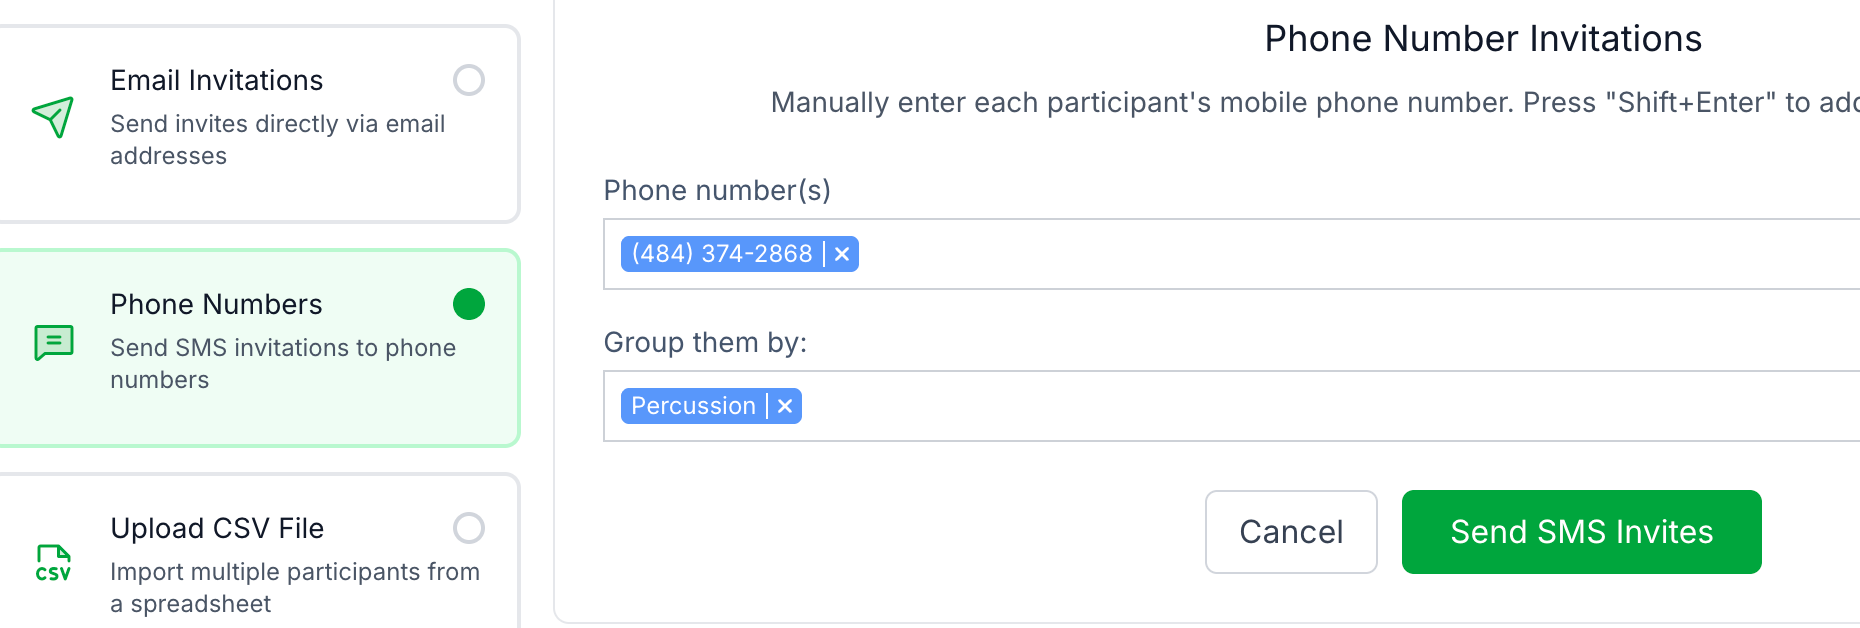
If you are not a CutTime Connected user, you will have three options for adding participants to your fundraisers: email, phone, or file upload. Let's go over the first two options here.
On the Invite Participants page, choose either the Email Invitations or Phone Numbers tab to enter the contact info for the Participant. If they need to be part of a Group, use the dropdown menu to add them to that Group.
When adding multiple participant entries by mobile phone or email, you will need to hit ‘enter’ or press the spacebar after each entry. Then click “Send Invites.”
Import Participant Information To A Fundraiser Using A File
If you prefer to invite participants using a file, start by clicking on the "Download the CSV Template" button to download the pre-formatted template. Enter the participant data into this template, save the file with your changes, and then upload it to this page using the "Import" button.

Select the Group they need to be part of, or add new Groups for them, then click "Import Participants".
Syncing and Inviting Participants into Simple Raise from CutTime
If you are a current CutTime customer and logged into Simple Raise with your CutTime user credentials, on the Invite Participants page, you will be able to sync rostered participants from your existing CutTime Group member data.
To initiate the CutTime sync, click on the dropdown menu and you will then be prompted to select the Program Season, followed by choosing either “All Students” or one of your existing Groups from the dropdown menu. (If you have already imported students/members you can click on the "See Current Imports" button).

Once you have selected your groups, you will see it appear in the “Select Value” field.
We only sync program members with current, validated contact information (email or phone). Good news, Simple Raise checks with CutTime nightly to ensure the participants are accurate so if you add someone to your Group or correct a contact in CutTime, Simple Raise will automatically reflect this roster change in your fundraiser and send the invitation.
Important Notes - if you start by adding fundraiser participants manually by phone, email, or file upload you will NOT be able to sync via the CutTime Groups function. You MUST start by syncing from CutTime, then you can add any additional participants not within your CutTime groups manually using one of the other methods. This is a system limitation due to how CutTime and Simple Raise govern the application of funds back to your participant’s individual account balances in CutTime. If you start off adding participants manually by mistake, you will have to delete the fundraiser and create a new one in order to use the CutTime syncing function.
You cannot connect two groups of members in DIFFERENT seasons into one fundraiser. We recommend you sync with your program’s current season in CutTime, and then you can create a new Group within that season for any other members you want to sync and invite to the fundraiser.
Final Step: Sending Out The Invites
When you are ready click on “Send Invites” or "Import from CutTime" to queue invitations for each of your participants. The timing of the invitation depends on whether you elected to have invitations sent automatically upon the fundraiser publication or opted to do this task manually.
By default, invitations are delivered via email.
- If only a cell phone number is provided, the invitation will be sent via SMS.
- If both an email address and a cell phone number are on file, the system will default to sending the invitation via email.
Managing Your Fundraiser Participants
View all of your participant invitations for this Campaign under the Participants tab at the top of your Campaign Page, or by going to the People Page.


Once a participant accepts the invitation to the fundraiser, their information will appear in this list. You can then use the search bar to look for a specific participants. Search by name, email, and phone number. You can also see their invitation status - Pending, All Active, Needs Donors, and Goal At Risk - by checking the table with your Participants.
Editing a Participant's Details
Click through on a member's name and from there, you can Edit or or perform additional Actions from their Participant Profile Page.


Edit:
Use the "Edit" button to update/correct a Participant’s email address or phone number, along with the method of invitation you wish to use. You can also Send their Invite. Click update to accept your changes.

Actions:

Use the "Actions" button to see more options for updating Participants' statuses - "Delete" or "Archive" Participants.
Find their Participant Storefront Link that you can pass onto them that they can use to share with Supporters.
There is also a Management Link that can be shared with the Participant (or an appropriate Guardian) to get logged in so they can manage their Participant Profile.
Goal Tracking
Go to the Campaign's Page Goals Tab to see the new Fundraiser Leaderboard:

Go to the Campaign's Page Participants Tab to see more details about each of your Participants such as:
- If they have successfully completed their Registration by logging into there Participant Profile
- Added Supporters
- Are a part of a Group
- Has made any Sales so far
- The number of Campaigns they are participating in

You can click on the Participant name to view more details about their current goal statuses, setup readiness, and contact info. There is also a section for the Supporters they have added, as well as their Campaign performance.


A Note About Participant Groups
You have the option to create and place your fundraiser participants into groups for competition or other oversight purposes. These group assignments are specific to Simple Raise. If you are a CutTime connected user, these groupings will not alter/modify your existing Groups within your CutTime Program account.
Additional Troubleshooting Guidance
If you have any Participants with ‘blocked’ or ‘restricted’ mobile devices that are managed by a Parent or Guardian, make sure you inform your participants to temporarily ‘unblock’ their phone to receive SMS notifications from Simple Raise about your fundraiser.
We also recommend that you utilize personal email addresses instead of school email addresses for your Participants, otherwise they may not receive the notifications about their fundraiser from Simple Raise due to IT restrictions at their school/school district.
Archiving Participants
Should you need to archive a Participant or to change them from being an Active Participant to a Supporter/Donor (for instance, recent graduates who would now be considered Alumni), you can mark them accordingly.
1) Go to the Participant's listing, either through the Campaign's Participant tab or through the People Page and click on their name.
2) On the Participant's page, click the "Actions" button.

3) You will have the option to "Archive" or move them into the Supporters list and out of your Active Participants.

4) If you chose "Add to Supporters", you will now find them in your Contacts Tab in the People Page with all of your Supporters/Donors.

If you chose "Remove Completely", you will now find them in your Archived Participants Tab in the People Page.

Should you need to restore a Supporter/Donor Contact to a Participant, you can click the "Restore" button.
