
Creating a Calendar Fundraiser
Table of Contents
Adding a Calendar Fundraiser to Your Store
- Step 1: Enter the Title/Description
- Step 2: Enter the Goal Type & Amount
- Step 3: Complete Calendar Fundraiser Details
- Photo Gallery
- Calendar Month
- Bonus Week
- Day Multipliers
- Youtube URL
- Start/End Date
- Add Custom Checkout Fields
- Categories
- Step 4: Invite Your Participants
- Print Participant Links
Adding A Calendar Fundraiser To Your Store
To set up a Calendar Fundraiser (These types of fundraisers are also known as "Pick-a-Date" or "Donate-a-Day") where Supporters can choose an amount to donate using dates on a calendar ($1-$31), you will create a new Campaign.
Go to the Campaigns Page and click "Add Campaign". This action will trigger the create campaign workflow.

Choose "Calendar Fundraiser" and follow the prompts there to begin setting up your calendar fundraiser.

Step 1: Enter the Title/Description
Enter the details for the fundraiser, including the title and description.
- Name (letters and numbers only, CANNOT have any special characters).
- Description (there is a 154 character minimum in order to publish)

Step 2: Enter the Goal Type & Amount
On the goal settings page, you can determine your Goal Amount (number in $ currency with no commas or spaces).
For this type of fundraiser you will need to set a goal and choose to make it either a Collective Goal or an Individual/participant Goals. Students can be added to a fundraisers with an individual goal or a collective goal, but will only receive credit using an individual goal. These goals are defined as follows:
Collective Goal
You set one singular goal for the fundraiser that is collectively shared by ALL of your fundraising participants. Everyone is working towards a common financial objective.

Individual Goal
You set a specific financial goal for EACH of your fundraising participants. You can also split the goal between the individual Participant, and the Angel Fund (the organization's funding).

Step 3: Complete Calendar Fundraiser Details
Photo Gallery:
You can also add photos of your fundraiser that will appear on your store front. The first photo you add will be featured on the store front as the main photo.
To upload images, simply drag and drop them or click to select and upload the images for your online store.
Formats supported: JPG, PNG, JPEG. Max size: 10MB (150x60px size). NOTE: PDFs are not supported
We recommend images 500x500px or larger that have a square crop
Calendar Month
Choose the calendar month so the campaign can calculate the corresponding amount for the day. ($1 = day 1, $31 = day 31, etc).
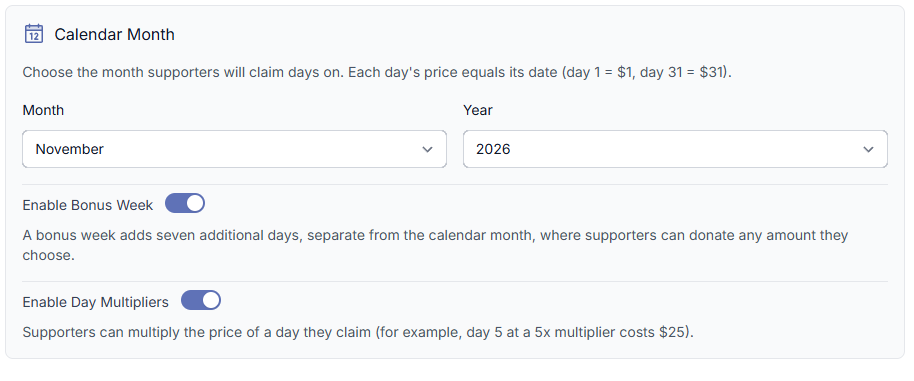
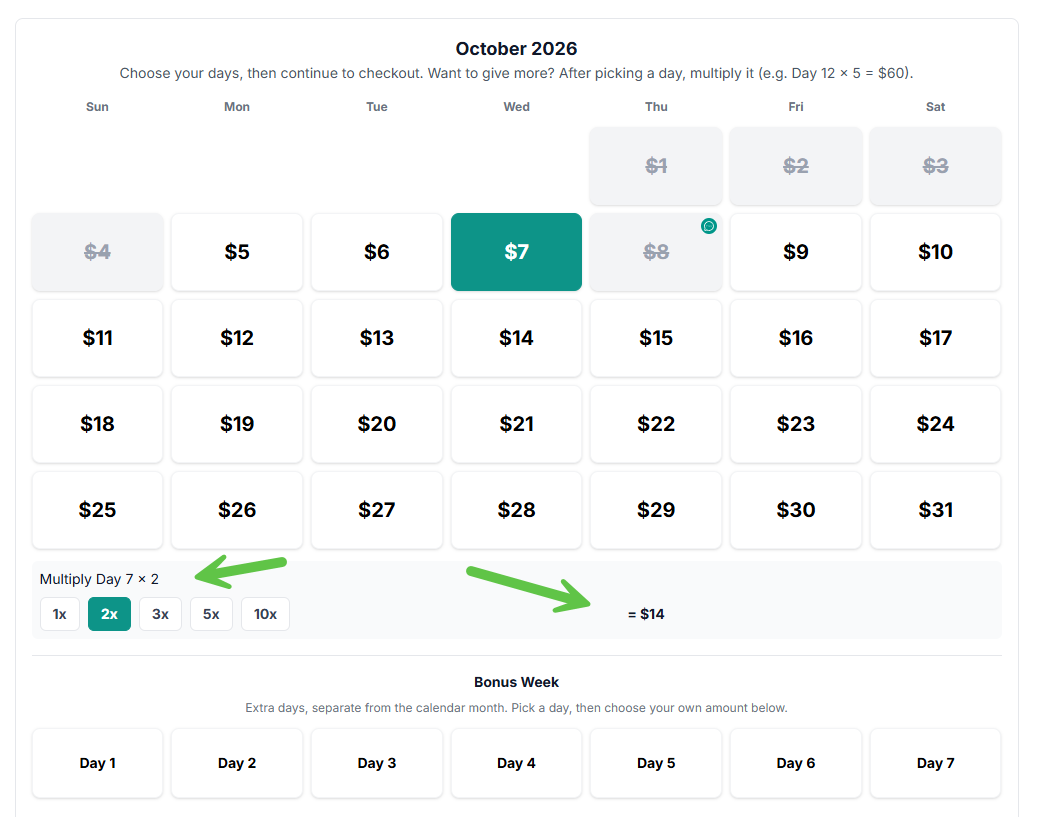
There is an option to enable a Bonus Week, in which the calendar will display an extra 7 days. In this case, even if all dates are taken, a Supporter can still "choose a date" to support the Participant.


There is another option to Enable Day Multipliers. This means for each calendar day selected you can add additional money by the multiplier indicator. See sample below.
Youtube URL
Add a video link here if you are promoting your Calendar Fundraiser with a Youtube video.
Start/End Date

Choose the start and end date of your fundraiser, as well as an Auto-Publish Date, should you need it.
Add Custom Checkout Fields
Should you need to collect information for this fundraiser - maybe adding a personal note on the donation, for example - you can make custom checkout fields. You can even make them required so they have to be filled out for customers to finalize their purchase on your store.

Note: Questions that have existing answers cannot be removed later once your store has posted and you have started processing orders. Instead, you can mark them as hidden.
Categories
The next page will ask you if you want to add a Product Category to this item, which you can do by selecting one or more of the checkboxes available.

Utilize Categories to organize the options in your online store by like items. Categories define how items on your Store are grouped and displayed within your store. You have the flexibility to create a unique set of categories for each store or opt not to use categories, depending on your preferred layout.
This could be for things like "Fundraiser", "Spirit Items", "Tickets", etc. (See example below)

What's great is that on the Storefront customers can click through on your categories to narrow down what items they can look through to help them find a specific item. So if you have tickets and fundraisers available, but all they really need is a sweatshirt for example, they can click through on a category like "Merch" or "Spirit Wear" to easily find what they are looking for.
You can create as many categories as necessary, and you have the flexibility to add more categories at any time in the future. Simply click through on your Organization Settings page to make that adjustment. Then scroll down to the section that says "Product Categories" and add your new Category. You can also rearrange the order of the categories displayed on your Store.

After a category is created in the online store, it cannot be deleted. However, you can make the category invisible by removing all products assigned to it.
Complete your setup: Check over your details then click "Finish" to publish this Calendar Fundraiser.

Step 4: Invite Participants
Go to the Participants tab in your Campaign's page, the follow the steps here to add participants.

If you do not add participants then the way that this Calendar Fundraiser will appear on your Store will give a brief message that states that they will need to use an individual Participant's donation link:

You can also use the Print options for this campaign to share the individual Participants links:


Need More Inspiration?
View our Frequently Asked Questions article here.
Get more Fundraising Promotional Tips from our website here.
Want to learn more about creating event tickets for your online store?
Click here for more information.